Around ten years ago I gave home brewing a try in my parents garage, the setup was very simple and consisted of the basics such as plastic buckets, syphons, tap water, etc. The beer produced was of a poor quality but the process was fun. Now that I have my own place with a bit of space I decided to give it another go, however this time with a slightly better setup.
Fermenter
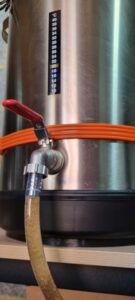
The fermenter I’m using is the “Grainfather Stainless Steel Fermenter”. It has a 25 litre capacity, is made from scratch resistant stainless steel, has handles for easy movement and pre cut holes in the sealable lid for an airlock. On the inside it has litre measurements stamped so you can easily tell how much water you have added.
The stainless steel makes it easy to clean and sterilise between uses which is a bonus. This bit of kit should last a few years with good care and cleaning.
CO2 Canister
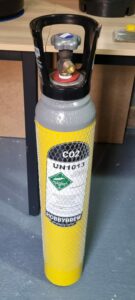
CO2 is used to prime kegs and carbonate beer. Combining CO2 with a keg means you can force liquids and gasses in and out which is very useful when you need to prime the keg, transfer beer or remove cleaning solutions etc. It took a while to find a local CO2 supplier of a grade suitable for beer but after some questions on a Facebook brew group I was recommended a local HobbyBrew supplier. This CO2 is 100% CO2 and 0% nitrogen which provides a large, lively bubble to the beer.
Kegs
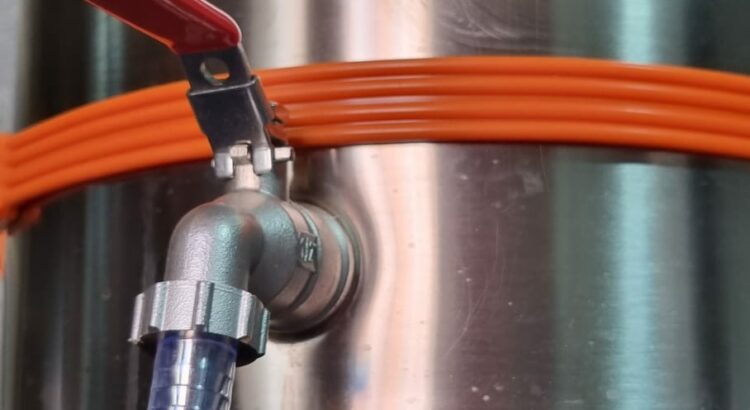
My setup includes two Cornelius Kegs, these are seen as the industry standard especially for home brewing so there is a lot of available help and accessories to get you started. The two pictured both have 19 litre capacities. This style of keg is very durable, can facilitate pressure to a point that beer carbonation will be optimal and are easy to transport, even when full. Again like with the fermenter, if these are looked after, cleaned and maintained well then they will last a very long time.

Hydrometer and thermometer
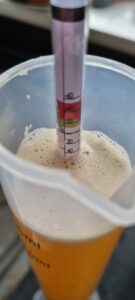
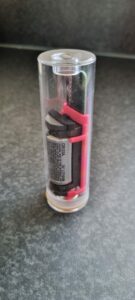
During the first brew using this setup I used a manual hydrometer and thermometer. This meant taking regular samples from the brew during the process via a sampling tube and noting regular readings. That process worked well but it means a lot of back and fourth to your fermenter and the readings can be a little inaccurate if you’re not careful. To make my life easier I invested in a second hand Tilt Hydrometer from Facebook BrewBay and I couldn’t recommend this gadget any higher! All you have to do is sterilise it and pop it fully into the fermenter with your beer, it then sends readings every 15 seconds over bluetooth to a phone nearby and uploads the data into a spreadsheet in the cloud. This means you don’t need to mess with your fermenter during the process and instead have a constant feed of data monitoring specific gravity and temperature.
Heat band
It varies by the type of beer you are making but most require a fermentation temperature range of between 20-25C so when the weather isn’t scorching then you need a way to keep your beer at the right temperature. Currently I’m using a very simple heat band combined with the temperature readings to monitor and adjust the temperature as needed, this is working okay but an improvement would be automatic regulated heating and cooling in the future.
During the heatwave I had to move the fermentor in and out of the fridge entirely a few times a day to keep the temperature in the correct range, that was a lot of work and the fermenter weighs around 20Kg when full.
Sterilising and cleaning equipment
It is very important when brewing beer to clean and sterilise all equipment that will come into contact with beer to have a clean environment and to avoid an infected brew. There are two steps to this, the first is using a good brush and cleaning powder mixed with water of the correct temperature to get rid of all the previous brew gunk, the second is to mix up a sterilising solution to ensure all left over bacteria is killed off. There are many products available on the market so it’s best to do your own research. One note is that you can get non-rinse sterilisers which means you don’t need to worry so much about rinsing the chemicals off post sterilising.

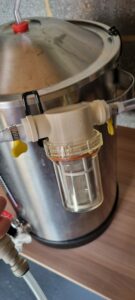
Filter
A filter can go between your fermenter and keg during transferring to ensure all non desirable materials don’t end up in your final kegged beer. This is more important if you have hops or hop pellets in your fermenter.
My latest brew used hop pellets so I invested in a “mac daddy” to remove all the rubbish and it worked very well!
Summary
This covers my current home brew setup, stay tuned for detailed brew posts and reviews of brew kits etc.
I have an Instagram that provides more regular updates, please do follow!